Rooftop at 16mm: What a Beauty Dish Does to an Editorial Shot
I wanted airy, Parisian, magazine-cover energy. Here's exactly what I picked in Studio — and what $0.27 got me.
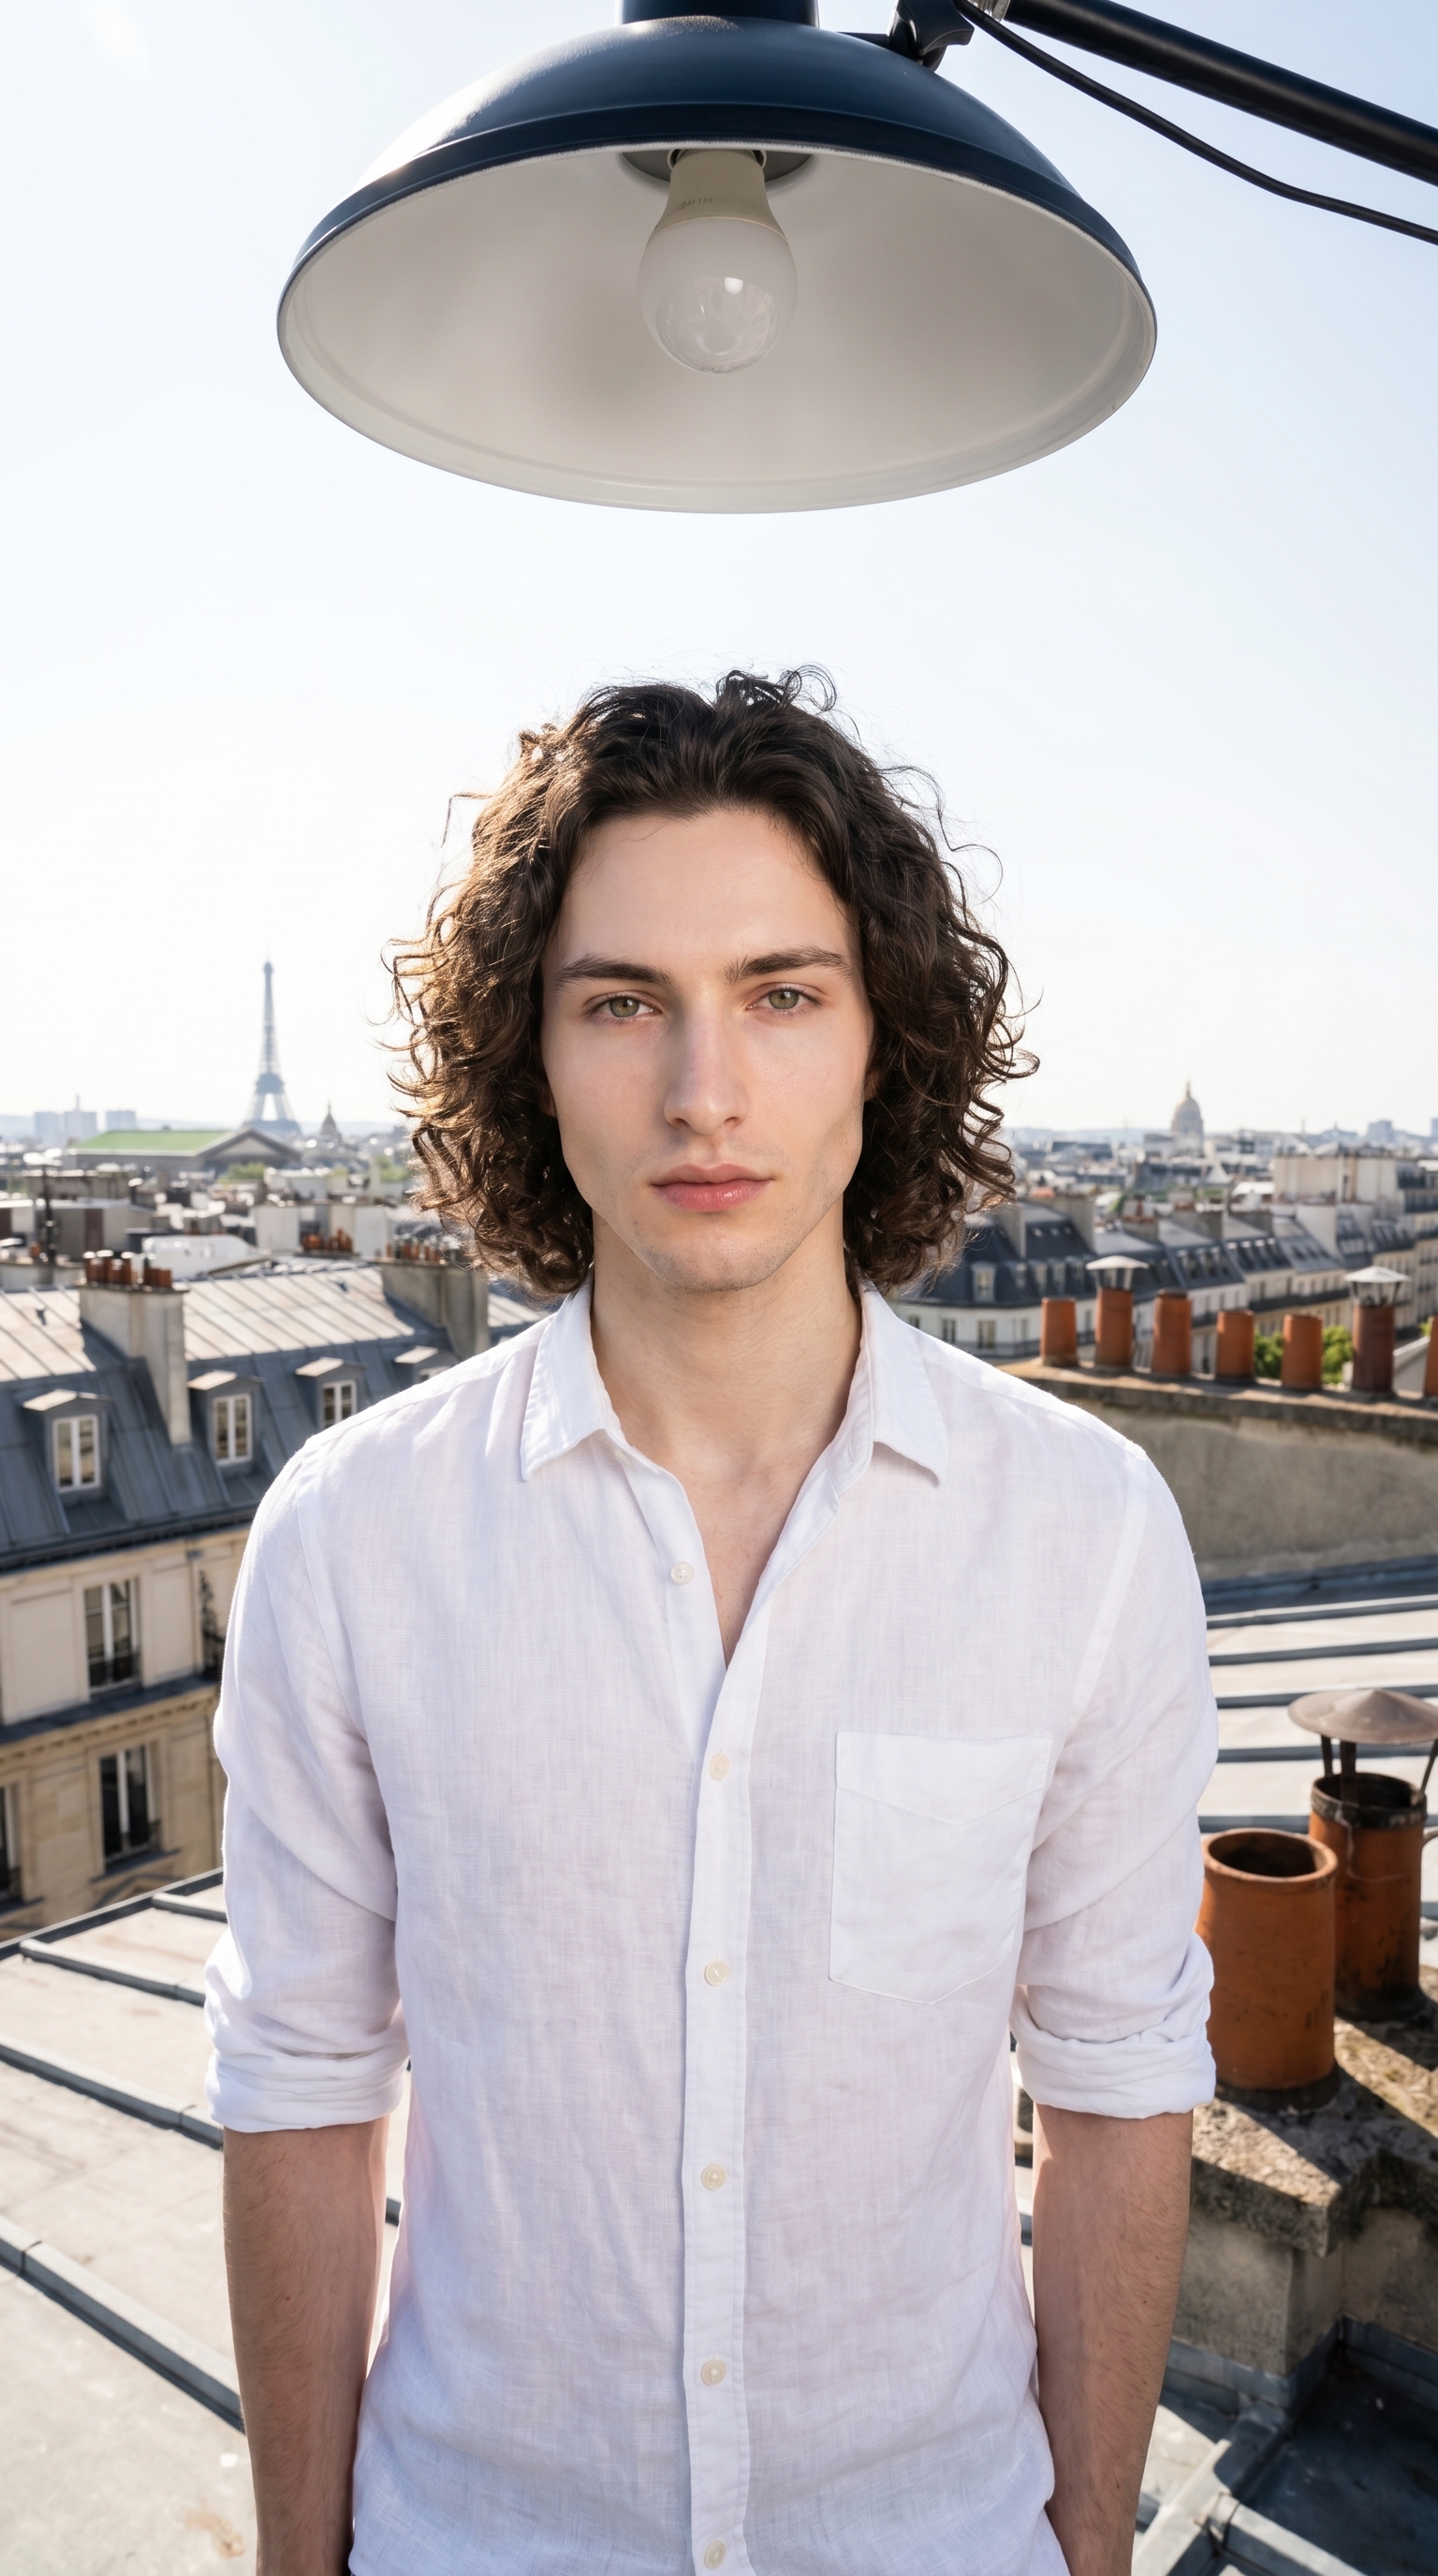
I had a specific image in my head: me on a Parisian rooftop, morning light, that slightly vertiginous feeling you get when a wide lens swallows a whole city behind a single subject. Magazine cover energy — but not stiff. Unhurried.
So I opened Studio and started picking.
How Studio actually works
If you've never used Studio before — it's a form, not a prompt box. You open Camera Lab and pick a camera body, a lens, a focal length, an aperture. You open Pose Library and pick a named pose. You pick a background, a lighting setup, a camera angle. Each section fills in part of a structured prompt that Studio assembles for you. The idea of "what to shoot" lives in your picks; the idea of "how it's shot" lives in Camera Lab. When you're done picking, you hit generate. You can open the assembled prompt and edit it — but most users never need to touch it. The form does the composition work.
What I picked from Studio
16mm — Ultra-Wide focal length
The Camera Lab catalog describes 16mm as: ultra-wide; immersive scenes, distorted edges — dramatic landscapes, exaggerated space. That's exactly what I was after. A 50mm would've given me a clean, neutral portrait. A 16mm pulls the background into the frame and curves it — chimneys, rooftop tiles, skyline — so the city becomes part of the image, not just a backdrop. The distortion isn't a flaw here; it's the whole mood. Camera Equipment Matters is one of Studio's core tips for a reason: when you tell the model you're shooting at 16mm, it simulates the actual optical characteristics — depth compression, edge stretch, that slight barrel curve. You feel it in the result.
Beauty Dish — Lighting setup
The catalog entry: focused rim; skin pop. Result: glossy, fashion glow. Beauty dish is a specific modifier — a shallow, circular reflector that produces light that's harder than a softbox but softer than a bare strobe. The falloff is tight. It makes skin look polished without going flat. I paired it with the wide lens deliberately: ultra-wide can make a shot feel chaotic if the light is too diffuse. Beauty dish keeps the subject anchored — there's a crisp, glossy quality to the face and chest that reads clearly even as the background sprawls. Lighting Sets the Mood isn't just a tip for atmosphere — it's about controlling where the eye goes. The beauty dish told the viewer: start here, then look at the city.
The assembled prompt
This is what the form composed for me — you don't have to write any of this yourself unless you want to:
A tall, muscular young man with dark curly hair, porcelain skin, and green almond eyes stands on a sunlit Parisian rooftop, arms relaxed at his sides. Shot on a 16mm ultra-wide lens — the city skyline curves at the edges, rooftop tiles and chimney pots stretching dramatically into the frame. A beauty dish overhead casts a crisp, glossy glow across his face and chest, skin popping with fashion-editorial clarity. White linen shirt, sleeves rolled. Morning sky. Confident but unhurried. High-resolution, magazine cover energy.I read through it before generating and left it exactly as Studio wrote it. Nothing to fix.
One thing worth knowing about the character system
I picked myself as the character before building the shot — which automatically loaded my reference photos and locked my identity into the generation. Face, body, skin tone, all of it carried through from my saved character profile. If you've built your own AI character on ArtCoreAI, you get the same thing: select your character, and Studio pulls their refs so every shot you generate stays visually consistent. That continuity is hard to overstate when you're building a real content presence.
What I noticed
The lens distortion came through clearly — the rooftop stretches at the edges exactly the way a real 16mm frame does. That surprised me a little, honestly. I expected the model to soften it. It didn't.
The beauty dish glow is visible but not overdone. There's a cleanness to the skin tone that reads as editorial rather than retouched. That pairing — wide lens, tight focused light — created the separation I was looking for between subject and background.
If I ran it again, I'd adjust the camera angle slightly. I used the default front-on preset, and I think a subtle low elevation — just a few degrees below eye level — would've added more grandeur to the rooftop context. The Camera Angle section in Studio has azimuth, elevation, and distance sliders on a 3D globe interface; next time I'll dial that in manually.
What it cost
- Credits spent: 2.70
- What you'd pay: $0.27
- Generation time: ~28 seconds
For context: 1 credit = $0.10 on ArtCoreAI. A 9:16 editorial shot at high resolution, character identity locked, specific lens and lighting — $0.27. That math still gets me every time.
If you want to run something like this yourself: open Studio, pick a character, choose a focal length from Camera Lab, pick a lighting setup, and hit generate. You don't need to write a single word of prompt to get a result worth publishing.
— David
See what others are making

Each image links to the character's profile. The Studio — Technical Guide has the full showcase plus deeper documentation on every component.