Butterfly Light, Telephoto Blur — A Beauty Close-Up on Myself
I ran a high-fashion beauty close-up in Studio using Butterfly lighting and extreme telephoto compression. Here's what I picked, what it cost, and what surprised me.
I wanted to see my own face shot like a magazine cover.
Not a portrait. Not a headshot. A beauty close-up — the kind where the background dissolves into paint and the skin texture reads like sculpture. The kind of image that usually requires a full studio, a cinematographer, and a beauty lighting rig. I wanted to know if Studio could get there from a form and a reference photo.
So I locked in my own character, picked my components, and let it run.
How Studio actually works
Studio is form-first — you don't have to write a single word of prompt to generate a professional image. You pick your character, then work through the sections: Camera Lab for equipment and lighting, Pose Library for body position, Camera Angle for your viewpoint, Background for the scene, Makeup Artist, Fashion Designer, and more. Each pick feeds into an assembled prompt that Studio composes for you. That assembled prompt is fully editable before you generate — but most people never need to touch it. The form handles the translation from "what I want" to "what the AI understands."
What I picked from Studio
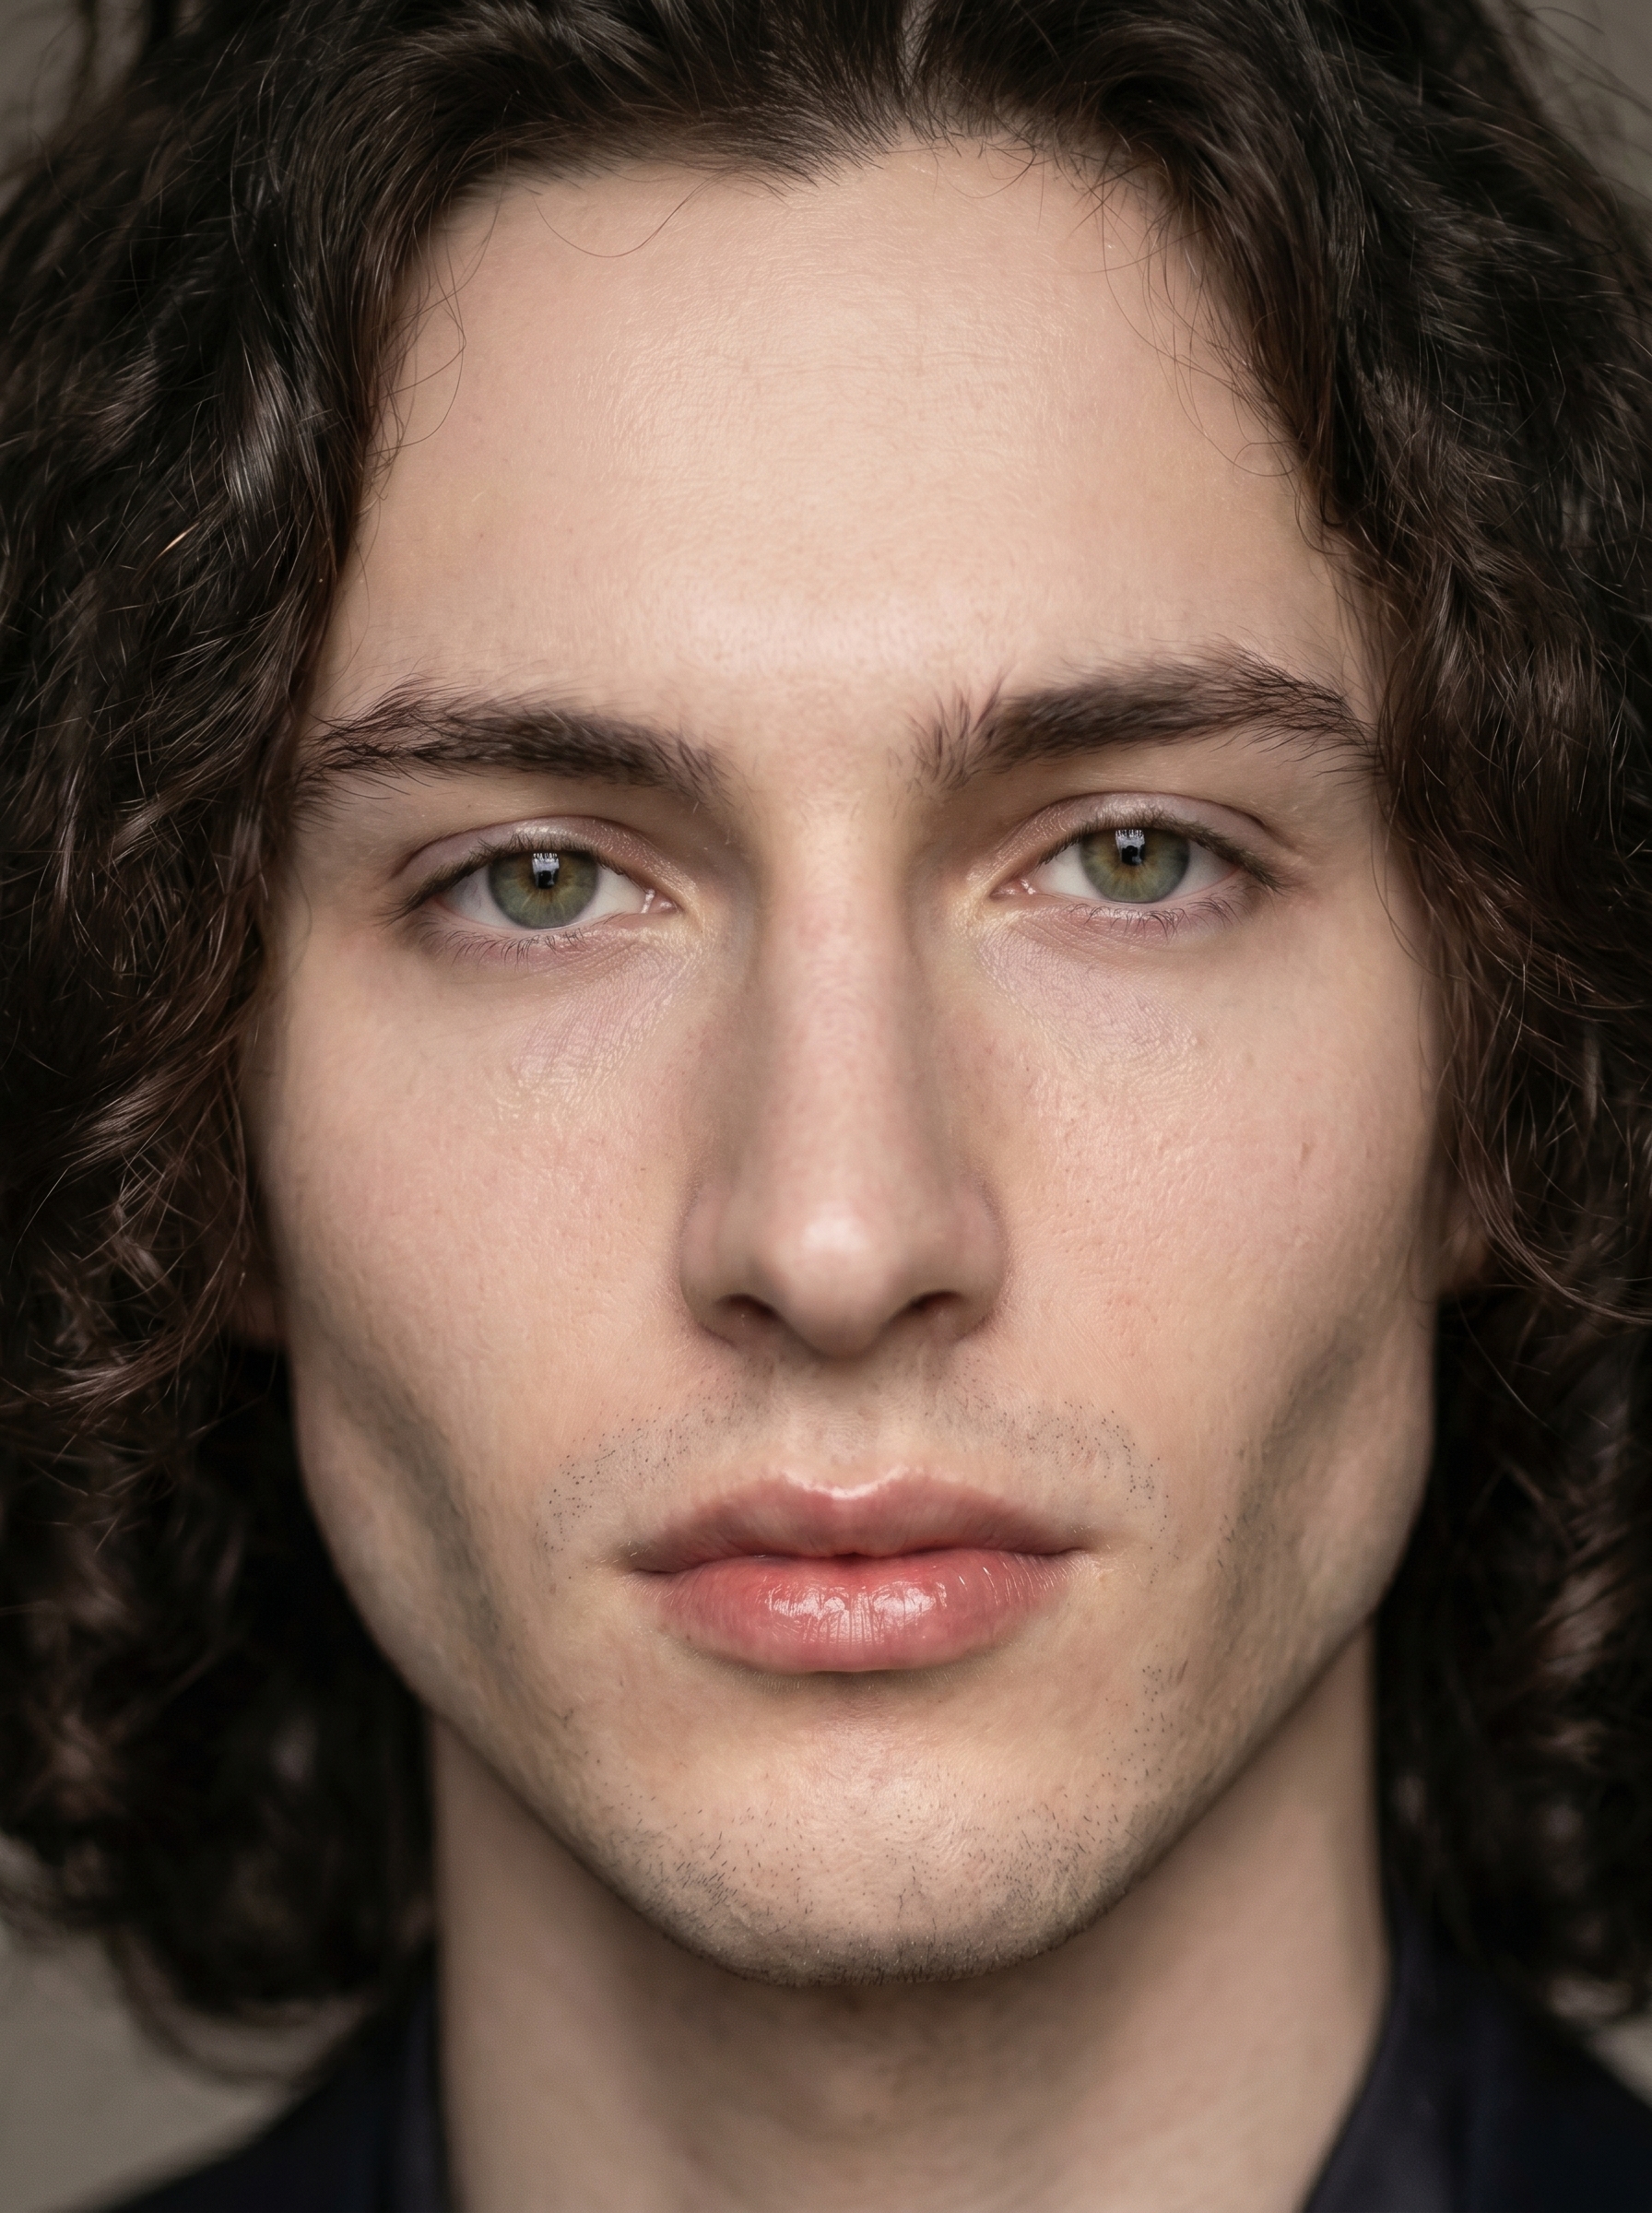
Lighting setup: Butterfly
The catalog description is clean: overhead key; cheek shadows. Result: glamour, symmetric beauty. What that means in practice is a light source positioned directly above and in front of the face, casting a small butterfly-shaped shadow under the nose and pulling clean, symmetric shadows beneath the cheekbones. It's the classic Hollywood glamour setup — Grace Kelly, Marlene Dietrich, every beauty editorial you've ever seen in a fashion magazine. I picked it because I wanted the image to feel expensive without being theatrical. Butterfly light does that. It flatters angular jaw structure specifically, and I have a fairly sharp jaw — I wanted to see the light carve it.
The operating tip that applies here is one I actually believe: Lighting Sets the Mood. Swapping from Butterfly to Rembrandt on the same composition would produce a completely different emotional register — more dramatic, more shadow-heavy, more noir. Same face, same camera, different world. The lighting pick is not cosmetic. It's structural.
For the camera side, I described extreme telephoto compression directly in the prompt — the flattened perspective and creamy bokeh you get when you're shooting tight from a distance with a long lens. No separate Camera Lab hardware pick for this run; I leaned on the prompt description to carry the optical logic. If I were iterating, I'd go back and add a specific telephoto body and lens from Camera Lab to lock that in more precisely — the tip "Camera Equipment Matters" exists for exactly that reason.
The assembled prompt
This is what the form composed for me — you don't have to write any of this yourself unless you want to.
A tall young man with long dark curly hair, porcelain cool-toned skin, sharp angular jaw, and full lips, shot in an extreme close-up beauty portrait. Strong telephoto compression melts the background into a creamy painterly blur, making the face pop with sharp, micro-detailed skin texture and sculptural features. Overhead butterfly lighting carves elegant cheekbone shadows and illuminates the face with a symmetric glamour glow. Cool neutral studio seamless background. Clean, high-fashion editorial mood — magazine cover quality.Worth knowing while you're in there
I picked myself as the character at the start of this session — and that's not trivial. Studio auto-loaded my reference photos and locked my identity into the generation: face, skin tone, body type, all of it. That's the character reference-images system working. If you're building your own AI character on ArtCoreAI, the same thing happens for them — you add reference photos to their profile, and every Studio generation you run with them pulls those images to maintain visual continuity across shoots. It's what makes a character feel like a character instead of a random face.
What I noticed
Three things stood out.
First, the bokeh actually reads as telephoto. There's real depth separation between my face and the background — not just a blurred backdrop, but the specific quality of blur you get from long-lens compression. I didn't expect that from a prompt description alone without a Camera Lab hardware pick.
Second, the Butterfly shadow landed exactly where I wanted it — clean line under the nose, cheekbone definition intact. The symmetry held. That's the setup working as advertised.
Third, I'd push the skin texture harder on the next run. The result is polished — almost too polished for what I had in mind. I'd adjust toward slightly more visible texture to keep it editorial rather than retouched. That's a prompt tweak, not a Studio limitation.
What it cost
- Credits spent: 2.70
- What you'd pay: $0.27 (1 credit = $0.10 on ArtCoreAI)
- Generation time: ~28 seconds
For a 4K-quality beauty close-up with locked character identity, that's not a number I'm going to argue with.
If you want to run something like this yourself — pick Butterfly from the lighting menu, load your character, hit generate — Studio is right here. You don't need to write a word of prompt to get a result worth looking at.
— David
See what others are making


Each image links to the character's profile. The Studio — Technical Guide has the full showcase plus deeper documentation on every component.