300mm + Clean Girl Glow: The Editorial Close-Up I Built in Studio
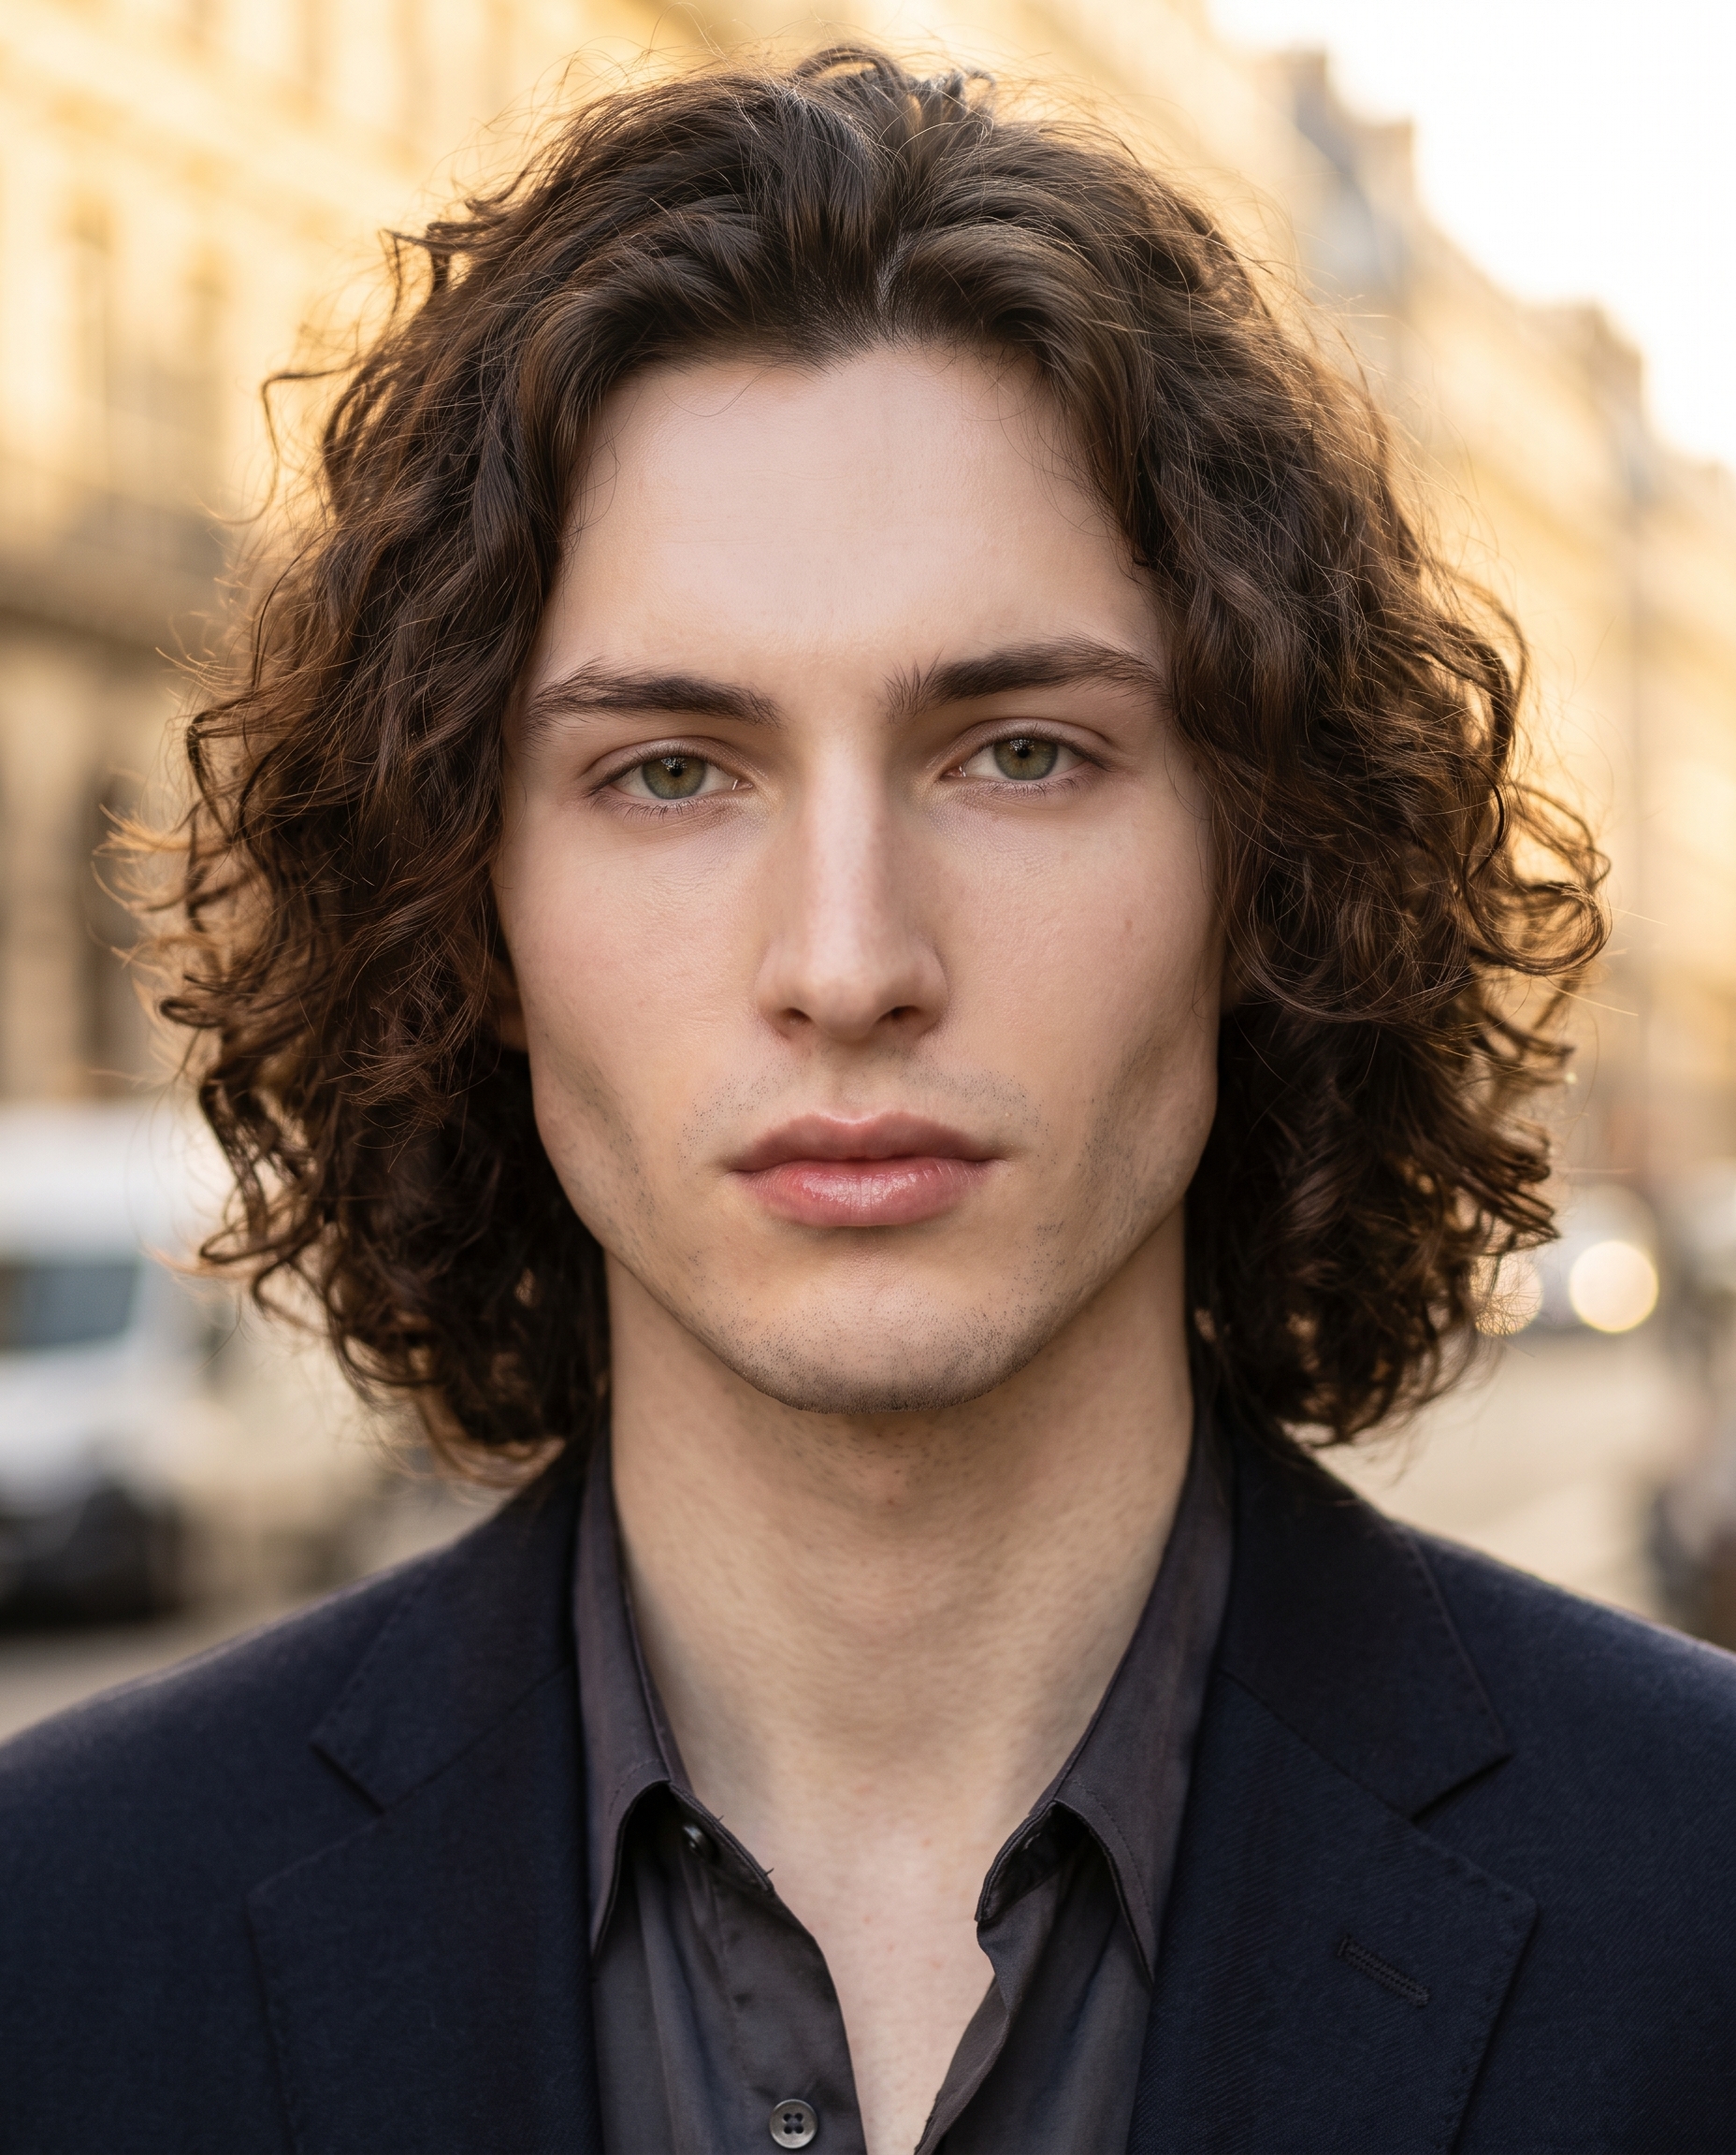
I wanted a shot that felt like it came off a fashion shoot in Paris — dewy skin, compressed background, super-tele isolation. Here's exactly what I picked and what came back.
I wanted one thing: that image you see on the cover of a French editorial magazine — the one where the background is this soft, golden blur and the face is so sharp it almost feels tactile. Compressed. Isolated. Skin that looks like light is coming from inside it.
No complex scene. No elaborate staging. Just a face, a lens that shouldn't exist at this proximity, and skin that earns the close-up.
So I opened Studio and built it.
How Studio actually works
Before I walk through what I picked: Studio is form-first. You don't open a blank text box and start writing prompts — you open a workspace with sections. Camera Lab, Pose Library, Camera Angle, Background, Makeup Artist, Fashion Designer, Location. You make picks from menus. Studio assembles the prompt for you.
The way I think about it: the form tells Studio what to shoot — the character, the pose, the outfit, the background. Camera Lab tells it how to shoot it — the body, the lens, the focal length, the aperture, the lighting. When you're done picking, there's an assembled prompt you can read, edit, or leave exactly as Studio wrote it. Most people never touch it. I'll show you what it built for me below.
What I picked from Studio
300mm — Super-Tele focal length
Studio's Camera Lab catalog lists this one plainly: "Super tele; ultimate reach. Style: sports/events, flattened perspectives." That last part — flattened perspectives — is exactly why I picked it for a portrait. At 300mm, the camera has to be far away to frame a face. That distance collapses the depth between subject and background. Everything behind me stacks up into a compressed wash of tone instead of a readable scene. Paris boulevard becomes golden blur. The effect is distinctly editorial — it's not how your phone shoots a portrait, and that gap is the whole point.
The operating tip I kept in mind here: Camera Equipment Matters. The AI isn't ignoring your focal length selection — it's simulating the actual optical behavior of that lens. Pick 50mm and you get a natural, slightly flat portrait. Pick 300mm and the background folds in on itself. The difference is visible and significant.
Clean Girl Glow — Makeup look
The catalog description: "Effortless dewy fresh-faced look — TikTok favorite, skin-first beauty." Which tells you the reference, but not why it works for a 300mm close-up. Here's why: at this focal length and sharpness level, the skin is the subject. There's nowhere for heavy product to hide. Clean Girl Glow keeps it luminous — barely-there foundation, glossy lips, feathered brows — so the skin itself does the work under Butterfly lighting from above. The result reads as editorial without reading as artificial. That's the balance I was going for.
The prompt Studio assembled for me
This is what the form composed — you don't have to write any of this yourself unless you want to.
Extreme telephoto portrait of a tall young man with long dark curly hair, porcelain cool-toned skin, and angular jaw — shot at 300mm, creating radical background compression and subject isolation. His skin looks luminous and glass-like, dewy with a fresh-faced effortless glow: barely-there foundation, glossy lips, feathered brows, skin-first beauty with no heavy product. Background is a blurred sunlit Paris boulevard, stacked golden tones compressed into a soft wash. Butterfly lighting from above. Editorial fashion mood, ultra-sharp on the eyes, 4K detail.That's 100% what the form built. I read it, decided it was exactly right, and hit generate.
What I noticed in the result
The background compression delivered. The Paris boulevard is unrecognizable as a location — which is the point. It reads as warm, golden atmosphere. The 300mm stacking did exactly what the catalog description promised.
The skin texture surprised me. The Butterfly lighting from above caught the dewy finish in a way I didn't fully anticipate — there's a highlight running down the nose and across the cheekbones that gives the skin genuine dimensionality. It doesn't look like a smooth render. It looks like a face under real light.
One thing I'd change: I'd try a second pass with an even shallower depth of field — lower aperture on top of the 300mm compression — to push the background separation even further. Worth a test at 1K resolution before committing to 4K.
Worth knowing while you're in there
Studio picked up my face from my character's saved reference photos automatically. I selected myself as the character, and Studio loaded my reference images and locked my identity — face, hair, skin tone — into the generation. That's how the curly hair and the porcelain cool-toned skin made it into the assembled prompt and into the result. If you've built an AI character on ArtCoreAI, you can do exactly the same: select your character, load their refs, and every image you generate carries their visual identity forward.
What it cost
- Credits spent: 2.70
- What you'd pay: $0.27
- Generation time: ~26s
That's at 4K — the maximum resolution Studio offers, suitable for print, editorial use, and anything that needs to hold up at close inspection. If you're iterating and testing, 1K brings the cost down significantly and gives you the same compositional feedback.
If you want to try this yourself: open Studio, pick a character, go into Camera Lab, scroll to 300mm, pick Clean Girl Glow from the Makeup Artist section, and hit generate. No prompt required — the form does it.
— David
See what others are making


Each image links to the character's profile. The Studio — Technical Guide has the full showcase plus deeper documentation on every component.