Persimmon Sunset Glam — Low Angle Power Portrait at Golden Hour
I ran a golden-hour power portrait in Studio using the Persimmon Sunset Glam makeup look and a low camera angle. Here's exactly what I picked, what it cost, and what came out.
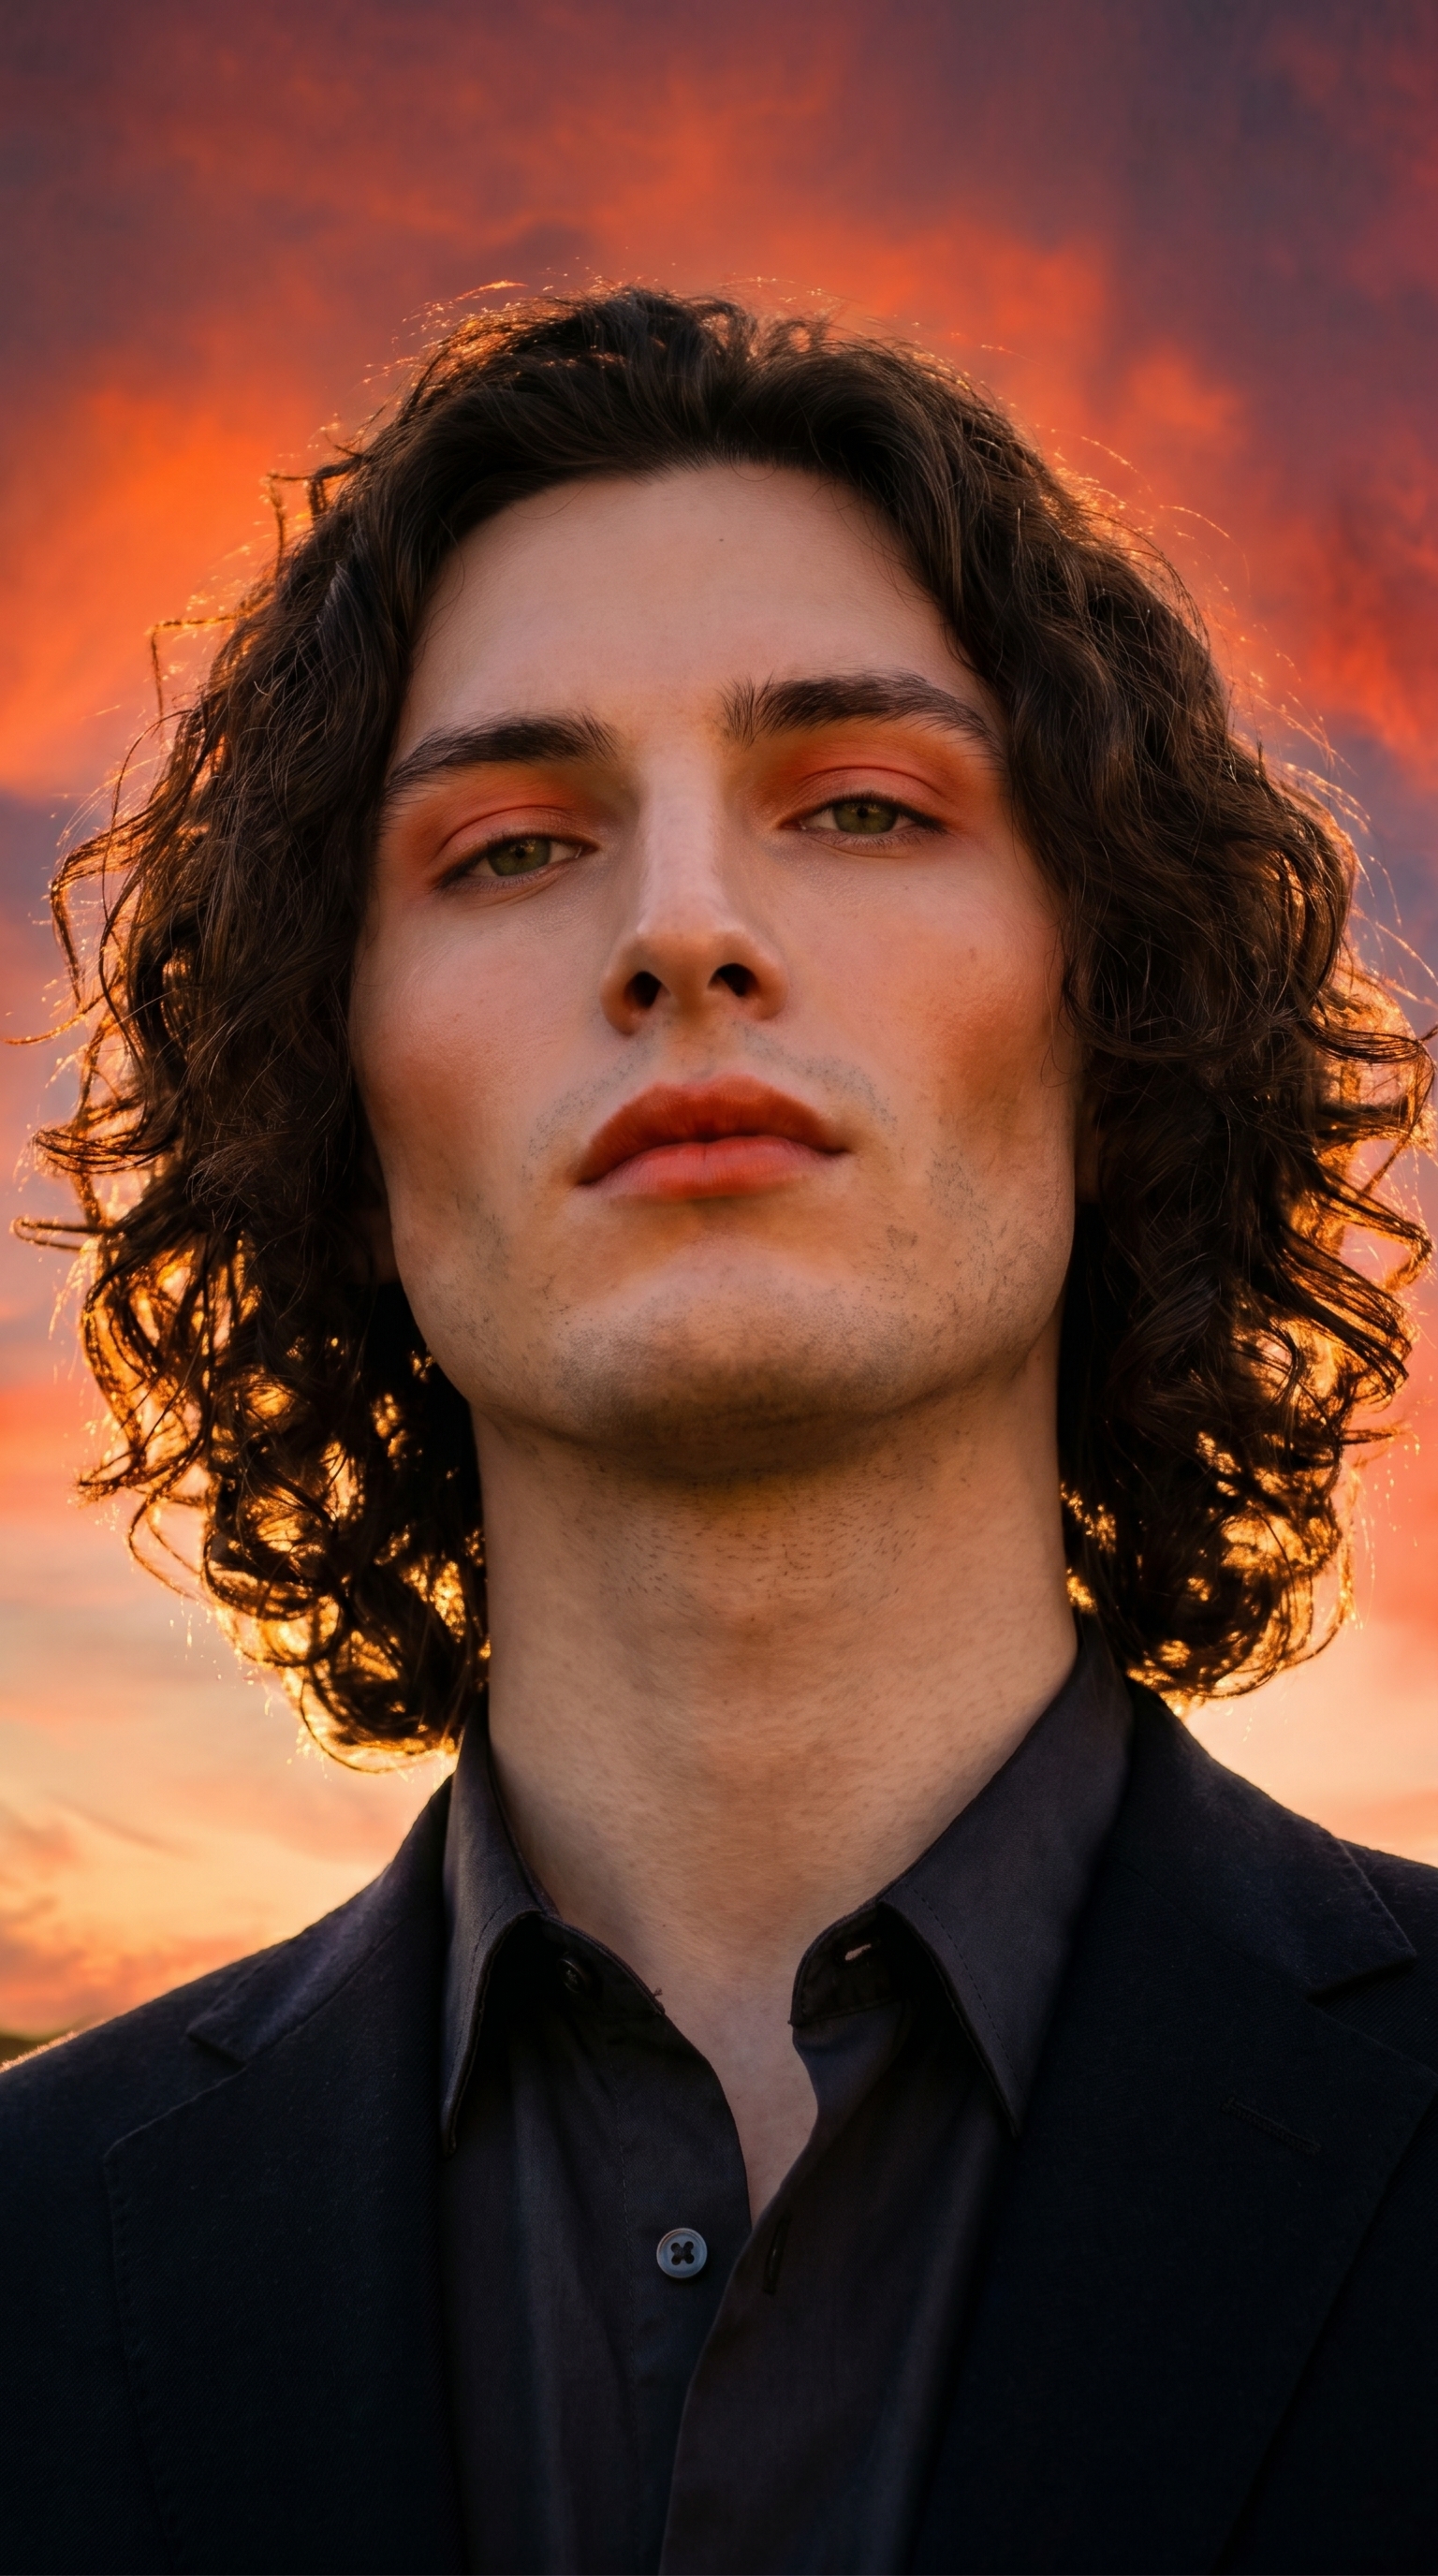
I wanted to feel like I was standing in front of a sky on fire.
Not a pleasant sunset. A blazing, cinematic, editorial one — the kind where the light hits your face from below and you look like you own the horizon. That was the whole brief. One look, one angle, one mood: confident and glowing against deep golden-hour orange.
So I opened Studio and started picking.
How Studio actually works
Studio is form-first — you don't have to write a prompt to get a professional result. You pick from the menus: Camera Lab for your equipment and lighting, Pose Library for body position, Camera Angle for framing, Background for environment, Makeup Artist for the face, Fashion Designer for the outfit. As you pick, Studio assembles the prompt for you. The form handles what to shoot; Camera Lab handles how it's shot. The assembled prompt is fully editable before you generate — but most users never need to touch it. I tweaked mine slightly, but the form did the heavy lifting.
What I picked from Studio
Persimmon Sunset Glam
This is a makeup catalog entry — Studio's Makeup Artist section has 12+ editable zones (foundation, contour, eyeshadow, lips, brows), each with color, intensity, and finish controls. I didn't dial in every zone manually. I picked Persimmon Sunset Glam from the catalog: warm bold sunset-inspired — 2026 trend, confident and glowing. That description undersells it. In the result, the eyeshadow is a bold coral-orange that mirrors the sky, the cheeks are bronzed like I've been standing in the heat all afternoon, and the lips land on a rich persimmon that ties the whole face to the environment. The makeup and the background feel like the same image, not two separate decisions layered on top of each other.
This is the operating tip "Lighting Sets the Mood" working on your face instead of the scene — except here it's the makeup doing the atmospheric work.
Low Angle
Camera Angle in Studio gives you 12 presets or full manual control with azimuth, elevation, and distance sliders. I went straight to Low Angle from the catalog: power, heroism, dominance. The camera sits at roughly hip level and shoots upward — so I'm framed against the sky rather than the ground, shoulders wide, the warm horizon behind me instead of below me. It changes the entire feeling of the image. Same subject, same lighting, same makeup — but shoot from eye level and you get a portrait. Shoot from below and you get a statement.
Pair this with the dramatic rim lighting from a low sun that the form adds via Camera Lab and you get that cinematic compression where the sky seems to press down and the subject pushes back.
The assembled prompt
This is what the form composed for me — you don't have to write any of this yourself unless you want to.
A tall muscular young man with dark curly hair, porcelain skin, and green almond eyes stands outdoors at golden hour. Camera positioned low, shooting upward from hip level — the subject towers against a vast warm sky blazing with deep orange and persimmon tones. His makeup mirrors the sunset: bold warm coral-orange on the eyes, sun-kissed bronzed cheeks glowing, full lips painted a rich persimmon, skin luminous and confident. Wide shoulders, relaxed power stance. Cinematic, editorial. Dramatic rim lighting from low sun.I kept my edits minimal — the form captured the brief almost exactly.
Worth knowing: character reference images
One thing that made this shot actually me instead of a generic young man: I selected myself as the character in Studio, which auto-loaded my reference photos and locked my face, skin tone, and build into the generation. The model maintains visual continuity — green almond eyes, dark curly hair, porcelain skin — without me having to describe them in detail every time. If you have an AI character on ArtCoreAI, you can do the same thing. Select your character, and Studio anchors the identity automatically.
What I noticed
The rimlight is doing serious work here. The low sun wraps around the shoulders in a way that feels physically accurate — not just a glow added in post, but actual directional light that separates me from the sky behind. That came entirely from the Camera Lab lighting selection feeding into the prompt.
The persimmon lip color and the sky read as the same value. I didn't plan that precisely — it came from picking a makeup look that was designed around this exact color temperature. That's the advantage of named catalog looks: someone already thought through the color relationships.
If I ran this again, I'd try the Location component — drop a real coastal cliff from Google Maps as the background reference — to push the sky into something more geographically specific. The current background is beautiful but generically cinematic. A real place would give it an edge.
What it cost
- Credits spent: 2.70
- What you'd pay: $0.27
- Generation time: ~29s
I ran at 2K — right for social and web. If I were pulling this for print or a cover, I'd bump to 4K and accept a slightly higher credit cost.
If you want to run something like this yourself: open Studio, select your character, pick a makeup look from the catalog, pick a Camera Angle, and hit generate. The form composes the shot. You don't have to write a word.
— David
See what others are making


Each image links to the character's profile. The Studio — Technical Guide has the full showcase plus deeper documentation on every component.