Rain-Slicked Paris at Dusk — Me, a Canon R5 II, and Studio's Form
I wanted a candid documentary street portrait — me, caught mid-stride on a wet Paris evening. Here's exactly what I picked in Studio and what it cost.
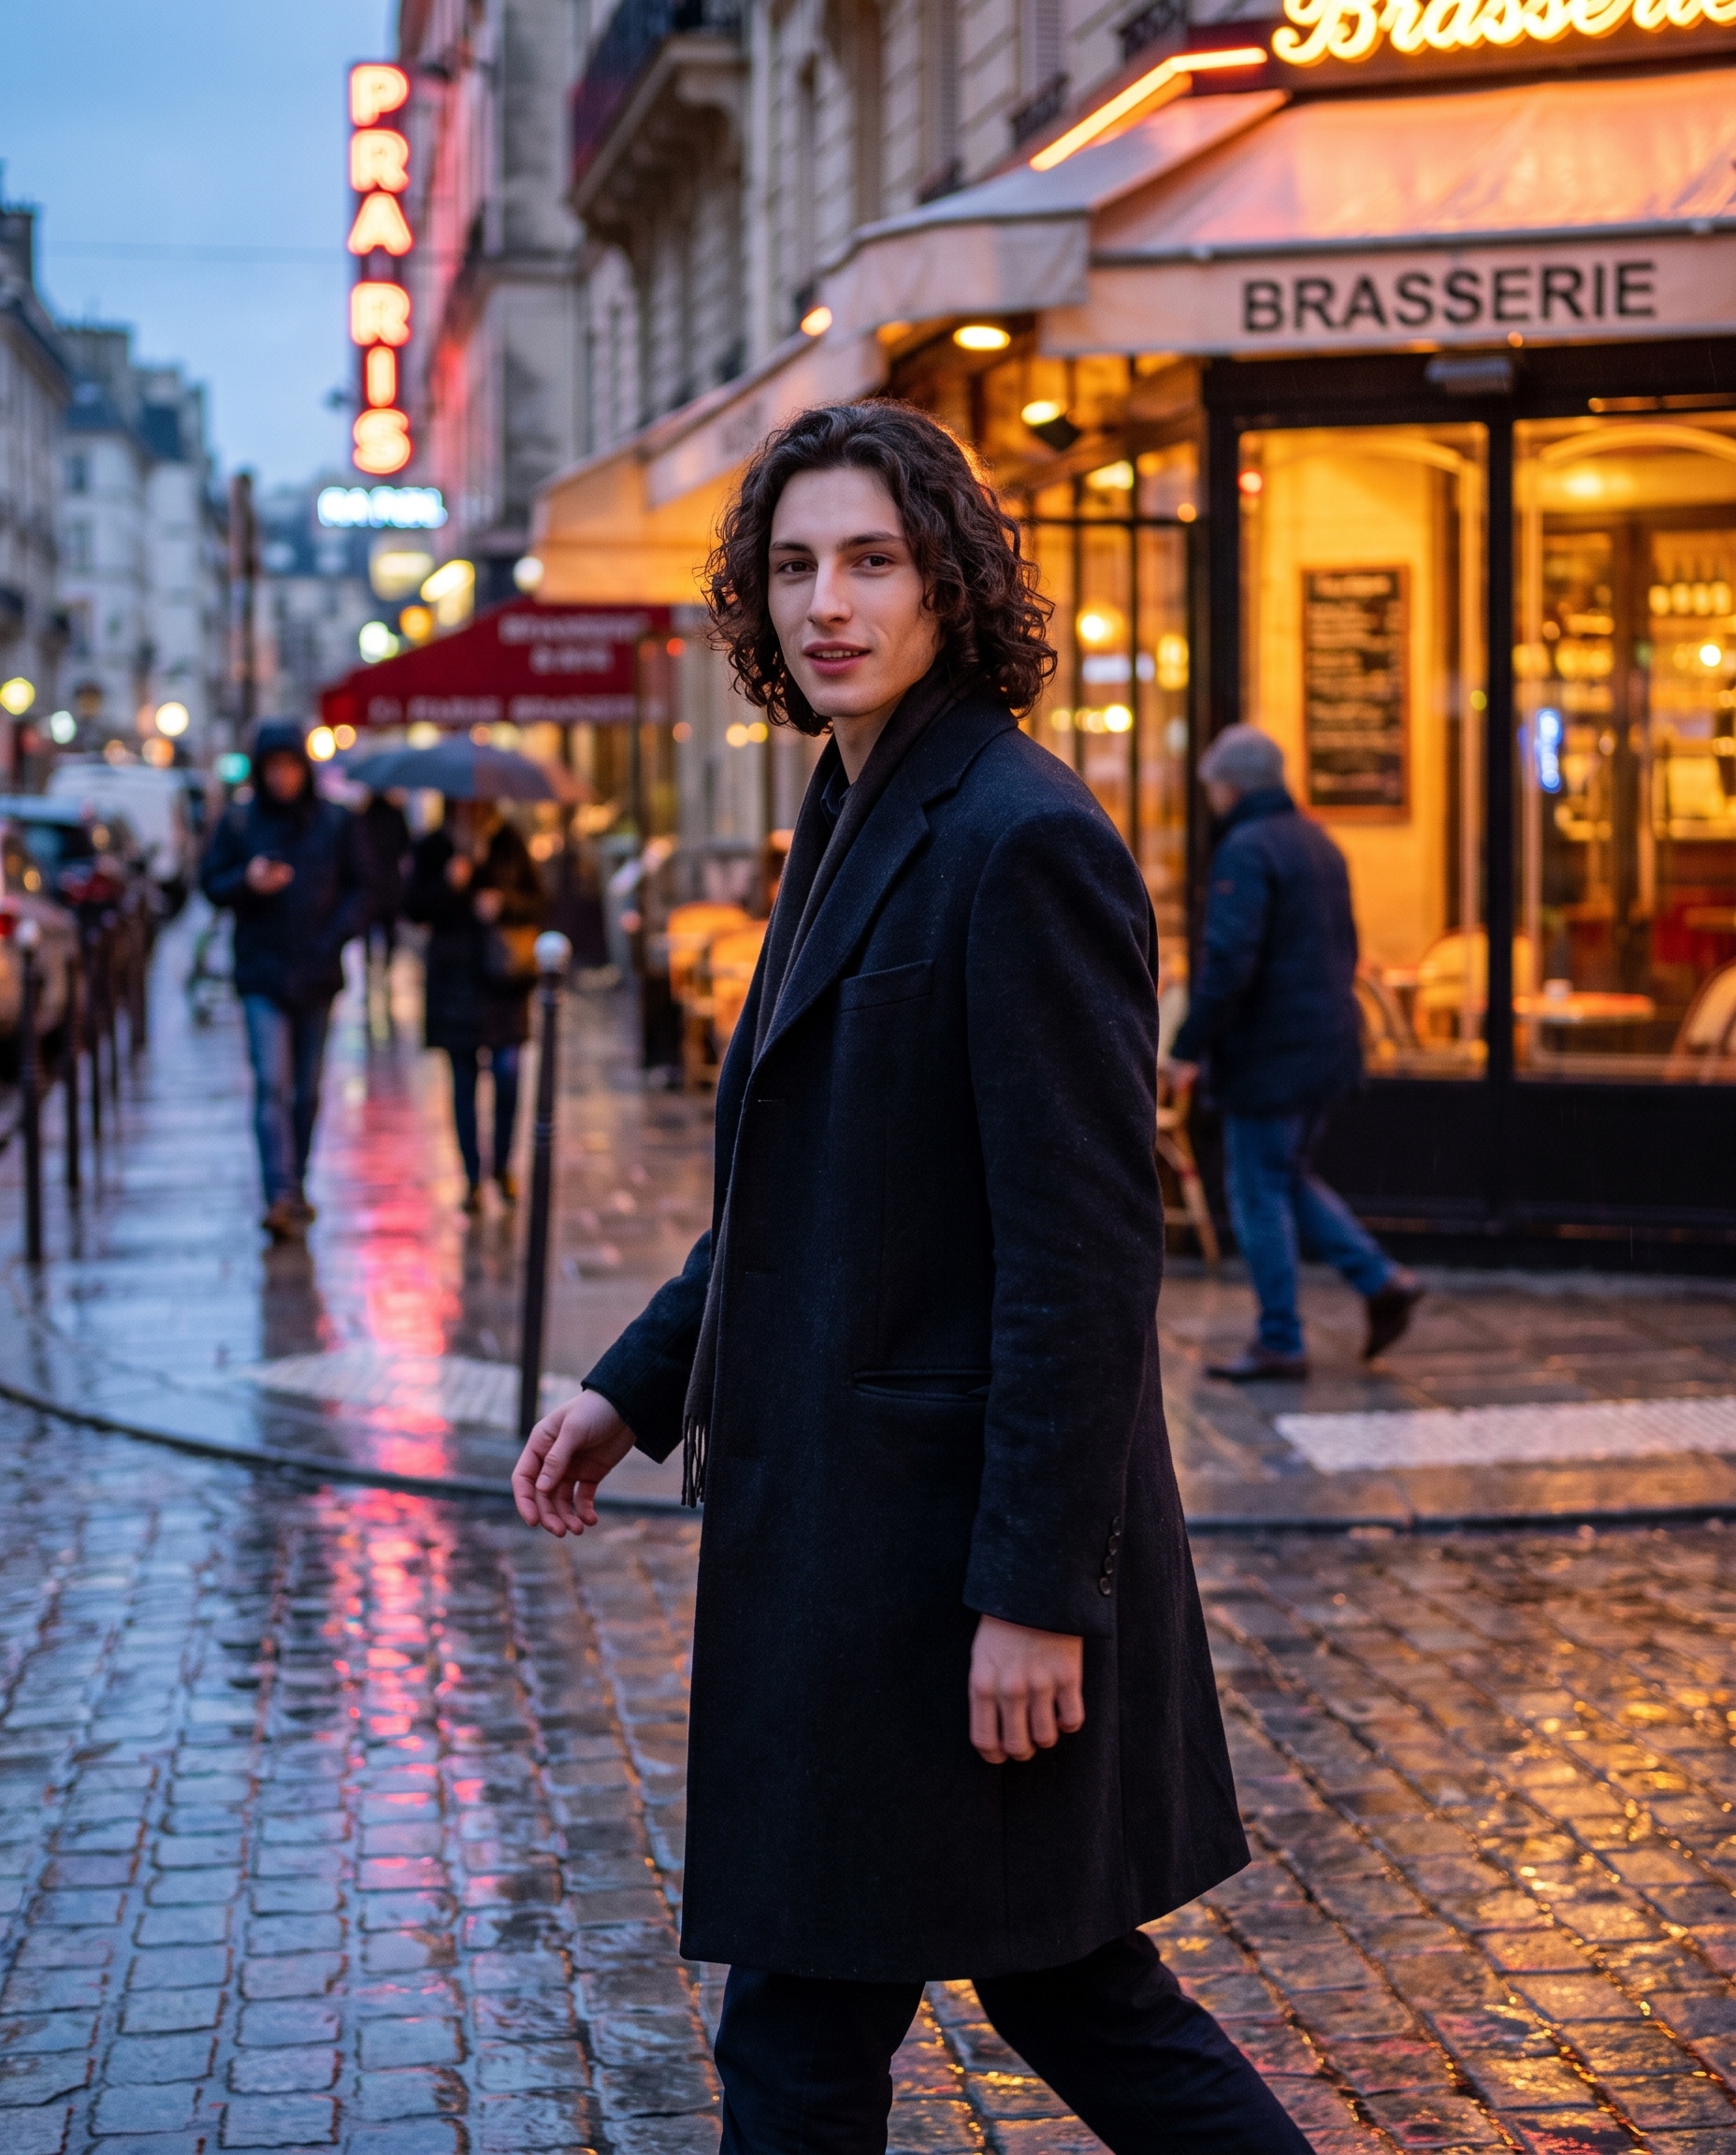
I wanted to feel like a frame pulled from a documentary — not a posed shoot, not a fashion editorial, just me caught mid-stride on a rain-slicked Paris street at dusk, the kind of shot a street photographer would take if they happened to be standing on the right corner.
That was the idea. One character (me), one strong urban mood, one real camera body. Let's see what Studio does with it.
How Studio actually works
If you've never opened Studio before, the first thing to understand is that you don't start by writing a prompt. You start by picking from menus — Camera Lab for your gear and lighting, Pose Library for how the subject is standing, Camera Angle for where the lens is placed, Background for the environment, Fashion Designer for the outfit, and so on. Studio assembles the prompt for you from those picks. The "what to shoot" lives in your form selections; the "how it's shot" lives in Camera Lab. The assembled prompt is fully editable before you hit generate — but most users never need to touch it. I touched mine, because I wanted to add specific language about the wet cobblestones and the brasserie glow. That's the optional path. The default path is: pick, pick, pick, generate.
What I picked from Studio
Canon EOS R5 Mark II — This is the camera body I chose in Camera Lab, and it matters more than most people expect. Studio's catalog describes it as an "all-around powerhouse; 45MP with stunning color science/skin tones, perfect for fashion/social media. Style: vibrant, balanced for hybrid photo/video." In plain terms: it's a full-frame mirrorless body known for rendering skin and color in a way that feels alive rather than clinical. I picked it because I wanted the neon reflections on wet cobblestones to feel saturated and real, not flat. You can see it in the result — the warm amber of the brasserie windows against the cool blue of the overcast sky has that particular contrast you get from a camera with strong color science, not from a filter applied after.
The operating tip that applies here is Camera Equipment Matters. Studio actually simulates depth of field, bokeh, and lens compression based on the body and lens you select. Picking a real camera body isn't decorative — it changes the physics of the render.
For lighting, I wrote into the assembled prompt rather than selecting a preset, because I wanted the scene to feel like available light at dusk rather than a lit studio setup. If I were going for a more deliberate portrait feel, I'd pair this body with Rembrandt lighting for drama or Butterfly for something cleaner — both are named presets in Camera Lab. Lighting Sets the Mood is the operating tip worth bookmarking: the lighting selection changes the result more dramatically than almost anything else in the form.
The assembled prompt
This is what the form composed for me — you don't have to write any of this yourself unless you want to.
A young man with dark curly hair and porcelain skin stands on a rain-slicked Paris street at dusk, caught mid-stride in a candid documentary moment. Shot with a Canon EOS R5 Mark II — vibrant color science rendering the neon reflections on wet cobblestones with cinematic clarity. Wide-normal perspective pulls in the full urban environment: blurred commuters, glowing brasserie windows, moody overcast sky. Fast aperture keeps the subject sharp against softly-bokeh street depth. Natural, immersive, alive.I added the wet cobblestones, the brasserie windows, and the "natural, immersive, alive" ending myself after reviewing the assembled draft. That's the edit-before-generate moment — optional, but worth using when you have a specific detail the form didn't quite capture.
One thing worth knowing about reference images
When I set this up, I picked myself as the character in Studio. That auto-loaded my reference photos — up to three saved shots — and locked my identity into the generation: my face, my dark curly hair, my porcelain skin, my build. The model maintained that visual continuity throughout the render. If you're building an AI character on ArtCoreAI, this is how you keep them consistent across every shoot — pick the character, let the refs do the work. You can also upload up to six additional object refs (a jacket, a product, a prop) and reference them with @tags in the prompt. The character refs run automatically; the object refs are yours to load manually.
What I noticed about the result
Three things stood out:
-
The color rendering landed exactly where I wanted it. The warm/cool split between the brasserie light and the evening sky felt genuinely photographic — not illustrated, not HDR-ified. That's the R5 Mark II's color science doing its job.
-
The bokeh depth reads as a real fast prime, not a generated blur effect. The commuters in the background are softly out of focus in a way that has actual optical character. Picking the camera body matters — I keep saying it because it keeps being true.
-
What I'd change: I'd add a specific lens next time — probably a 35mm f/1.4 — to get more compression control on the background scene. The wide-normal feel is right for the documentary angle, but naming the lens would have given me more specificity over how far back the street recedes.
What it cost
- Credits spent: 2.70
- What you'd pay: $0.27
- Generation time: ~30s
For a 4:5 image with full character identity lock and a real camera body baked into the render physics — twenty-seven cents is not a number I need to think twice about.
If you want to run this yourself: open Studio, pick a character, drop into Camera Lab, select the Canon EOS R5 Mark II, choose a lighting preset, and hit generate. You don't need to write the prompt. The form builds it. Start there.
— David
See what others are making

Each image links to the character's profile. The Studio — Technical Guide has the full showcase plus deeper documentation on every component.