Paris Winter Morning — A Candid Street Portrait in Studio
I wanted a caught-in-motion street portrait — early winter light, cobblestones, the energy of someone turning back mid-step. Here's what I picked in Studio and what came out.
The idea
I wanted a specific feeling — not a polished fashion plate, not a headshot. That particular Paris winter morning energy: overcast sky, cobblestones still damp, a person caught mid-turn as if someone just called their name from across the street. Documentary, not directed.
The challenge with that kind of shot is the in-between quality. Too clean and you lose the candid feel. Too noisy and it just looks like a bad photo. I wanted the tension between those two — and I wanted to see how Studio's Street & Documentary preset pack handled it.
So I ran it. Here's what happened.
How Studio actually works
Before I get into the picks — if you haven't used Studio before, this matters: you don't start by writing a prompt. You start by picking from menus.
Camera Lab lets you choose a camera body, lens, focal length, aperture, and lighting style. Pose Library gives you named poses. Camera Angle has 12 presets or full manual control. Background, Makeup Artist, Fashion Designer — each section is its own form. You fill out what you want, and Studio assembles a prompt from everything you've picked. The "what to shoot" comes from your form choices; the "how it's shot" comes from Camera Lab.
You can edit the assembled prompt before you generate — and I did tweak mine — but most users never need to. The form does the writing for you.
What I picked from Studio
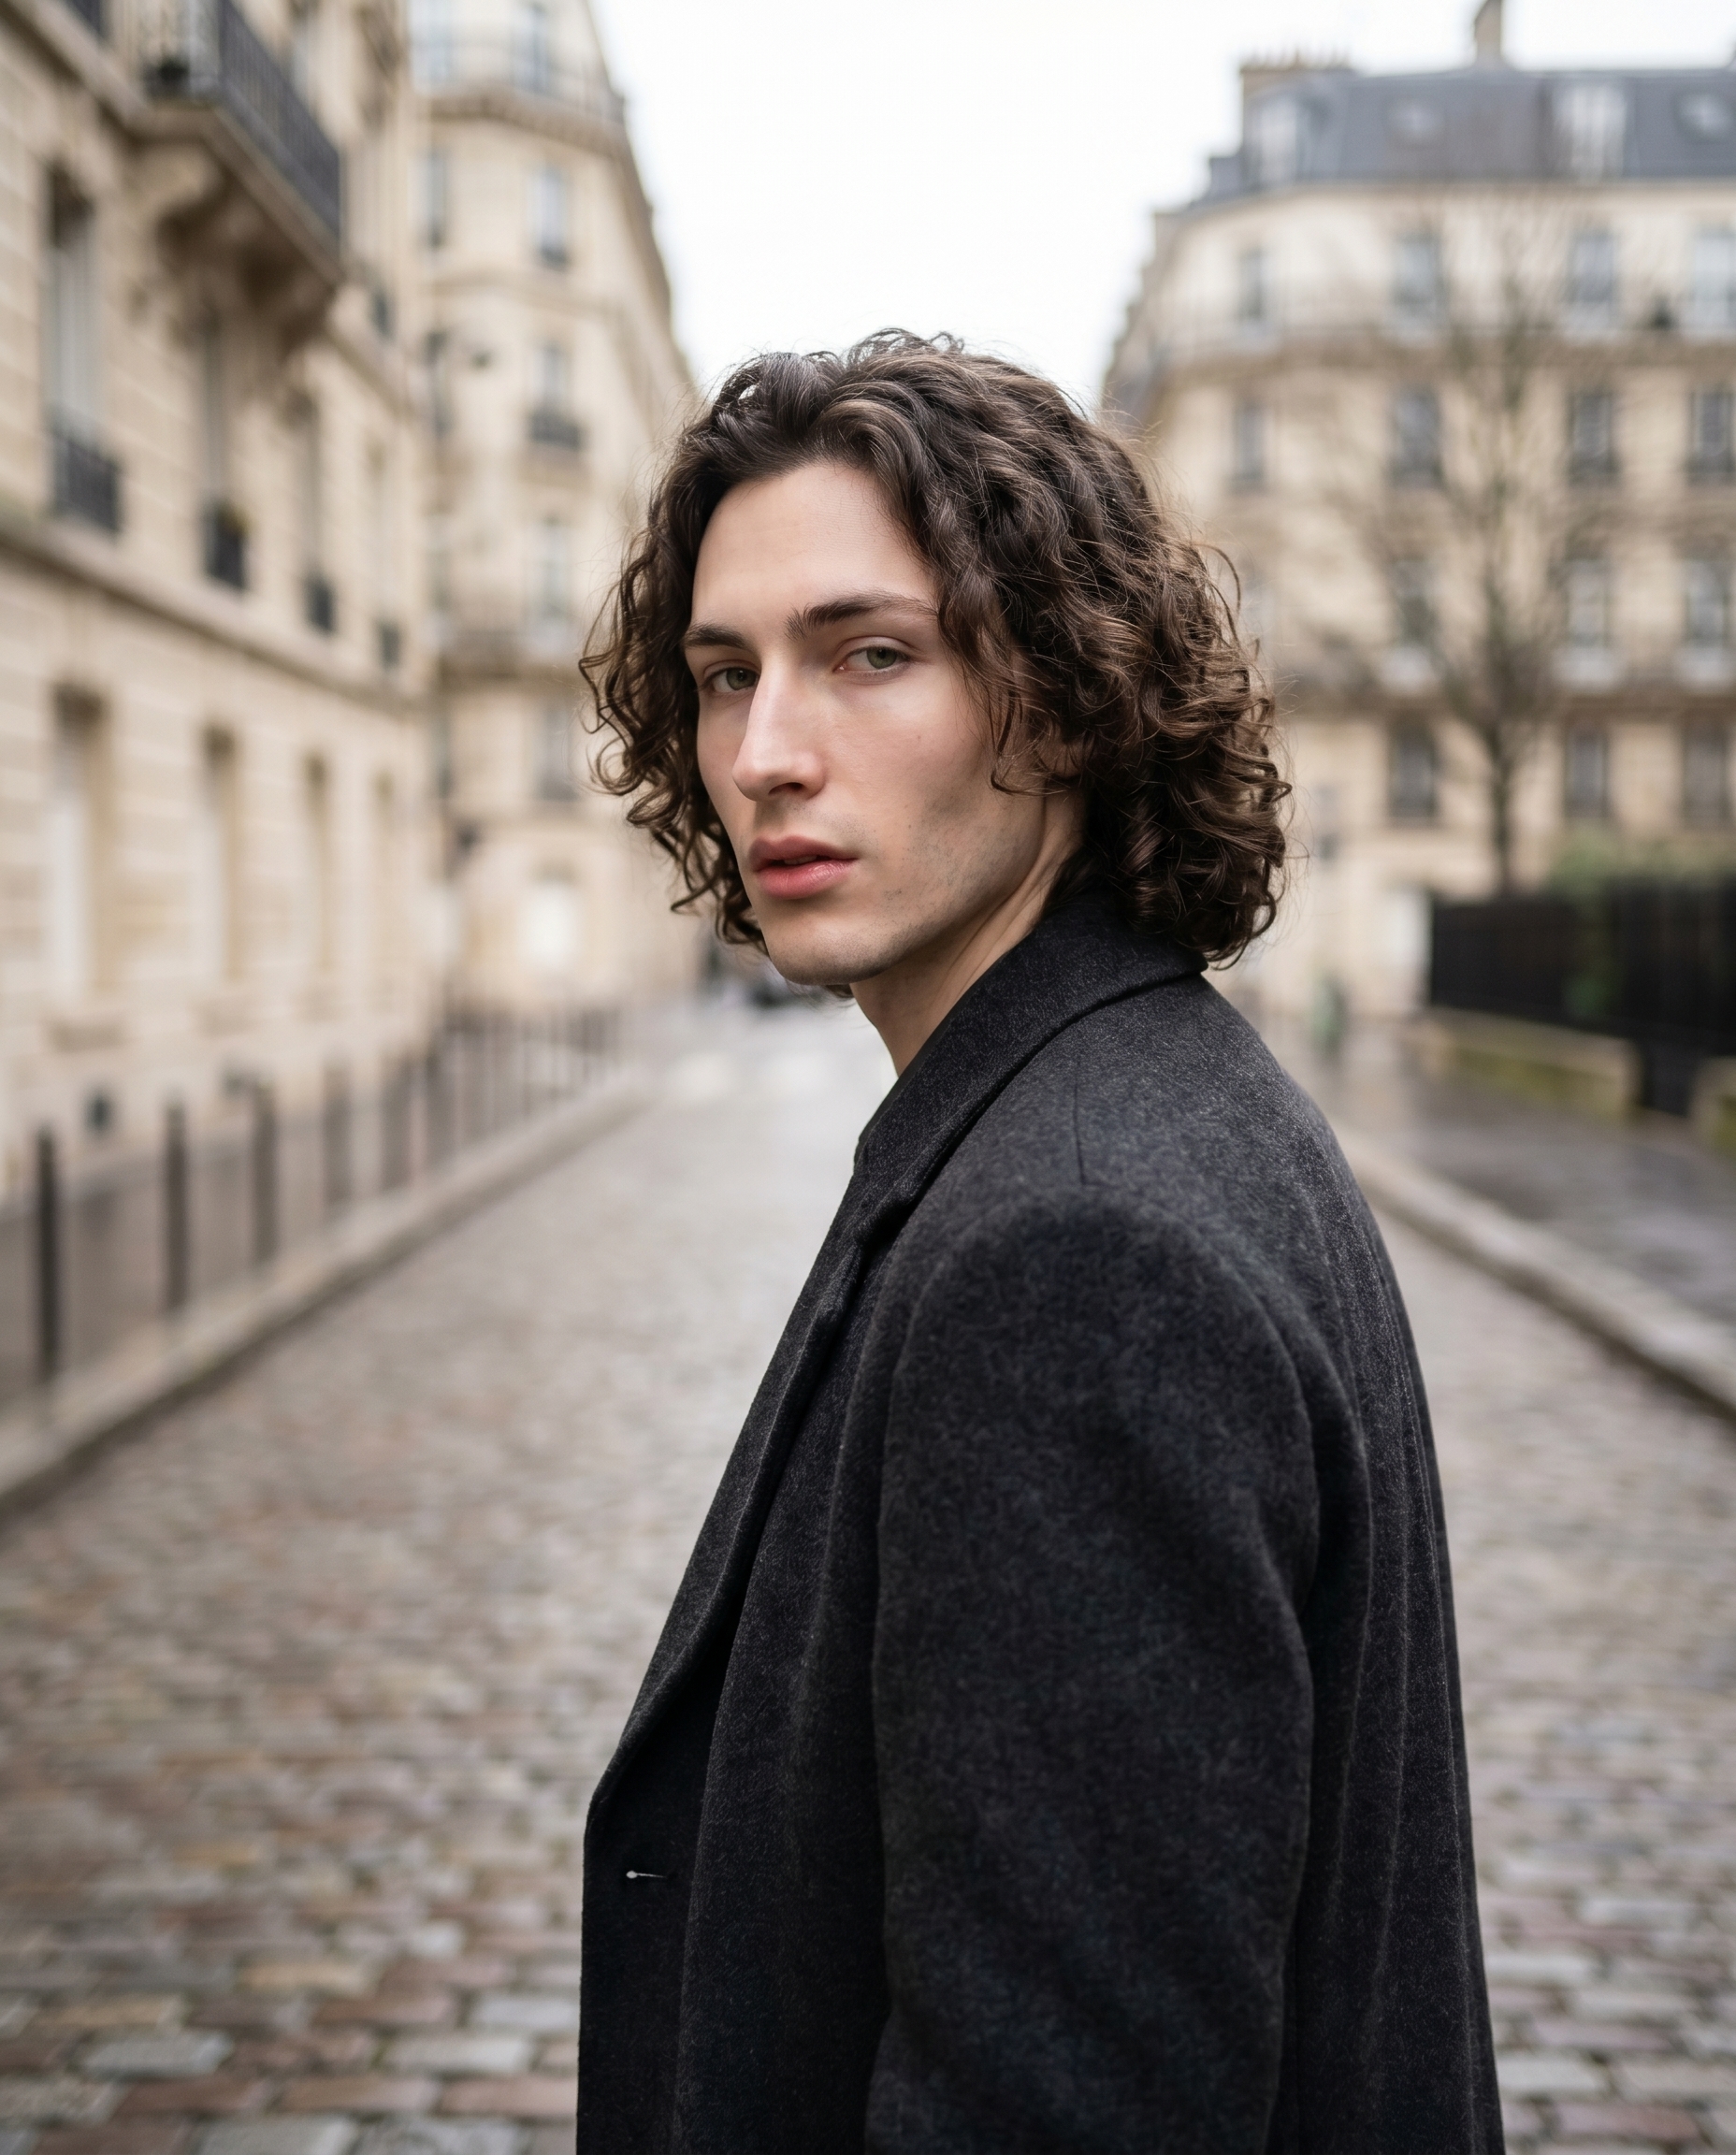
Street & Documentary — This is the Camera Lab preset pack I chose. The name tells you the intent: street photography aesthetics, documentary realism, the kind of setup a photojournalist reaches for. Under the hood, preset packs bundle a real camera body, a lens, focal length, aperture, and lighting style into a single selection — instead of making seven individual decisions, you pick one proven combination. For this shot, it pulled in wide-angle character, authentic grain texture, and a natural light bias. This is exactly what the "Use Preset Packs" tip in the Studio docs is about: start with a photographer's go-to setup, then adjust from there.
f/1.4 — I added this aperture on top of the preset pack specifically because I wanted that ultra-shallow depth of field. At f/1.4, the lens is wide open — almost no depth range stays sharp, which means background elements (the Haussmann facades, the cobblestones further back) melt into bokeh while whatever is in the focal plane — in this case, my eyes — stays tack-sharp. Studio simulates authentic lens characteristics from your aperture selection, so this wasn't decorative. The "Camera Equipment Matters" tip puts it plainly: depth of field, bokeh, and lens compression are all calculated from what you pick in Camera Lab. Choosing f/1.4 here was a direct creative decision, not an afterthought.
Combined, Street & Documentary gave me the documentary skeleton and f/1.4 gave me the wide-open lens that pulls the eye straight to the face.
The assembled prompt
This is what the form composed for me — you don't have to write any of this yourself unless you want to.
A tall young French man with long dark curly hair, green eyes, porcelain skin, and an angular jaw stands on a quiet Paris street in early winter morning. He wears a heavy charcoal wool overcoat, slightly turned away before glancing back over his shoulder — a caught-in-motion candid energy. Soft diffused overcast light wraps his face with no harsh shadows. Wide-angle perspective pulls in the cobblestone pavement and blurred Haussmann facades behind him. Ultra-shallow depth of field from f/1.4 melts the background into creamy bokeh while his eyes stay tack-sharp. Authentic, documentary feel — like a frame pulled from a fashion photojournalism spread.I did write into the prompt directly here — the overcoat, the over-the-shoulder turn, the Haussmann detail — because I had a specific scene in my head and wanted to push it further than the form alone would take me. But that's the optional path. The form builds the foundation; you only touch the prompt if you want to.
Worth knowing while you're in there: Studio also has a character reference-images system. Because I picked myself as the character, my reference photos auto-loaded and locked my identity — face, skin tone, body type — into the generation. That's not prompt work; it's one click on the character selector. If you've built your own AI character on ArtCoreAI, the same thing works for them.
What I noticed
What worked: The bokeh is genuinely creamy. The f/1.4 render didn't produce that artificial halo you sometimes see — the background blur has real depth gradient, sharpening slightly on the mid-cobblestones before going fully soft on the facades. The over-the-shoulder turn landed with actual mid-motion energy, not the stiff "turned pose" look.
What surprised me: The overcast light wrapping. I expected flat — overcast usually reads as flat in AI image work. Instead the light has a subtle directionality, as if the clouds are thinner on one side. That added dimension I didn't specifically ask for.
What I'd change: The charcoal wool overcoat lost some texture detail in the darker tones. If I ran this again, I'd either bump to a mid-grey for better fabric definition or add a specific texture note in the prompt. The f/1.4 render prioritised the face (correct) but it cost me coat detail.
What it cost
- Credits spent: 2.70
- What you'd pay: $0.27
- Generation time: ~28s
I generated at full 4:5 aspect ratio. For a test or iteration run, 1K resolution would have cost less — Studio scales resolution to credit cost, so it's worth starting cheaper if you're still deciding on your composition.
If you want to run something like this yourself — pick the Street & Documentary pack, dial in f/1.4, drop your character, hit generate — Studio is right here. No prompt required unless you want one.
— David
See what others are making

Each image links to the character's profile. The Studio — Technical Guide has the full showcase plus deeper documentation on every component.